
Cloud services have improved our lives and made our jobs easier – BUT they have also given hackers a worldwide platform of unlimited power with which to attack us… very sad but very true!
😲 😲 😲 😲 😲 😲 😲 😲
This makes it even more critical to secure our external-facing services as much as we can.
Hopefully you have a WAF in front of your web server, but if you are like me and have a small site that does not justify the associated costs of advanced protection, here are some basic steps to take on your Windows Server. Note that ‘Strict High Transport Security’ (step 4) is available from IIS 10 in 2019 Server.
If you’re an IT nerd like me, you just gotta be happy with a result like this from https://www.ssllabs.com/ssltest…
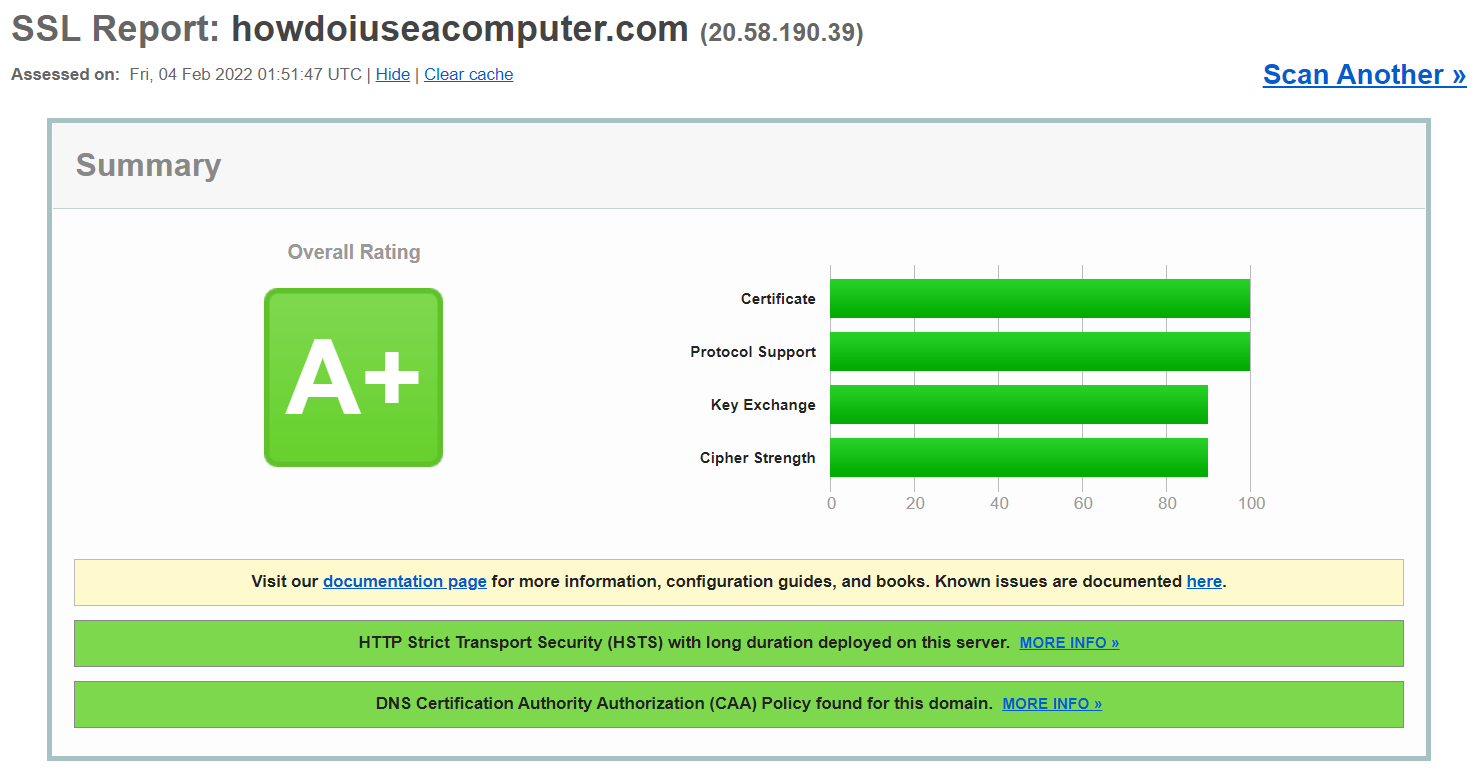
NOTE: When you run the test, remember to check the box if you do not want the result to be displayed on the page…

👍👍👍👍👍👍👍👍👍👍👍👍👍👍👍👍👍👍👍👍👍👍👍👍
OK – to business! There are four initial steps we can perform on a personal or small business web server that is exposed to the interwebs… resulting in an A+ score from an SSL test. Note that this is ideally run from the web server with traffic allowed inbound on port 80 and 443 (you can redirect 80 to 443, but 80 does need to be open for LetsEncrypt to work without manual intervention – AFAIK 😃).
- Apply a Lets Encrypt certificate.
a) they are free!
b) they have a great reputation.
c) they are so easy to install it is not even funny!
Go to win-acme.com, click downloads and grab the latest version. Extract to c:\program files\win-acme. Run wacs.exe and follow the prompts… you can manually specify hostname, additional SAN names if required, or generate a wildcard. Use the default in memory validation; this creates a virtual directory (which is in memory and removed afterwards) in IIS for LetsEncrypt to connect to to verify the request. The app then automatically creates and applies a certificate that is valid for 3 months, then sets up a scheduled task to automatically renew the cert before expiry. Boom! 😁😁
Refer to https://www.win-acme.com/manual/getting-started.
2. Secure the protocols…
Open PowerShell ISE (run as admin), paste and run the code below to confirm TLS 1.0 and 1.1 are disabled and TLS 1.2 is enabled for the system and .NET:
# disable TLS 1.0 and 1.1
New-Item 'HKLM:\SYSTEM\CurrentControlSet\Control\SecurityProviders\SCHANNEL\Protocols\TLS 1.0\Server' -Force | Out-Null
New-ItemProperty -path 'HKLM:\SYSTEM\CurrentControlSet\Control\SecurityProviders\SCHANNEL\Protocols\TLS 1.0\Server' -name 'Enabled' -value '0' -PropertyType 'DWord' -Force | Out-Null
New-ItemProperty -path 'HKLM:\SYSTEM\CurrentControlSet\Control\SecurityProviders\SCHANNEL\Protocols\TLS 1.0\Server' -name 'DisabledByDefault' -value 1 -PropertyType 'DWord' -Force | Out-Null
New-Item 'HKLM:\SYSTEM\CurrentControlSet\Control\SecurityProviders\SCHANNEL\Protocols\TLS 1.0\Client' -Force | Out-Null
New-ItemProperty -path 'HKLM:\SYSTEM\CurrentControlSet\Control\SecurityProviders\SCHANNEL\Protocols\TLS 1.0\Client' -name 'Enabled' -value '0' -PropertyType 'DWord' -Force | Out-Null
New-ItemProperty -path 'HKLM:\SYSTEM\CurrentControlSet\Control\SecurityProviders\SCHANNEL\Protocols\TLS 1.0\Client' -name 'DisabledByDefault' -value 1 -PropertyType 'DWord' -Force | Out-Null
New-Item 'HKLM:\SYSTEM\CurrentControlSet\Control\SecurityProviders\SCHANNEL\Protocols\TLS 1.1\Server' -Force | Out-Null
New-ItemProperty -path 'HKLM:\SYSTEM\CurrentControlSet\Control\SecurityProviders\SCHANNEL\Protocols\TLS 1.1\Server' -name 'Enabled' -value '0' -PropertyType 'DWord' -Force | Out-Null
New-ItemProperty -path 'HKLM:\SYSTEM\CurrentControlSet\Control\SecurityProviders\SCHANNEL\Protocols\TLS 1.1\Server' -name 'DisabledByDefault' -value 1 -PropertyType 'DWord' -Force | Out-Null
New-Item 'HKLM:\SYSTEM\CurrentControlSet\Control\SecurityProviders\SCHANNEL\Protocols\TLS 1.1\Client' -Force | Out-Null
New-ItemProperty -path 'HKLM:\SYSTEM\CurrentControlSet\Control\SecurityProviders\SCHANNEL\Protocols\TLS 1.1\Client' -name 'Enabled' -value '0' -PropertyType 'DWord' -Force | Out-Null
New-ItemProperty -path 'HKLM:\SYSTEM\CurrentControlSet\Control\SecurityProviders\SCHANNEL\Protocols\TLS 1.1\Client' -name 'DisabledByDefault' -value 1 -PropertyType 'DWord' -Force | Out-Null

# enable TLS 1.2 for .NET
New-Item 'HKLM:\SOFTWARE\WOW6432Node\Microsoft\.NETFramework\v4.0.30319' -Force | Out-Null
New-ItemProperty -path 'HKLM:\SOFTWARE\WOW6432Node\Microsoft\.NETFramework\v4.0.30319' -name 'SystemDefaultTlsVersions' -value '1' -PropertyType 'DWord' -Force | Out-Null
New-ItemProperty -path 'HKLM:\SOFTWARE\WOW6432Node\Microsoft\.NETFramework\v4.0.30319' -name 'SchUseStrongCrypto' -value '1' -PropertyType 'DWord' -Force | Out-Null
New-Item 'HKLM:\SOFTWARE\Microsoft\.NETFramework\v4.0.30319' -Force | Out-Null
New-ItemProperty -path 'HKLM:\SOFTWARE\Microsoft\.NETFramework\v4.0.30319' -name 'SystemDefaultTlsVersions' -value '1' -PropertyType 'DWord' -Force | Out-Null
New-ItemProperty -path 'HKLM:\SOFTWARE\Microsoft\.NETFramework\v4.0.30319' -name 'SchUseStrongCrypto' -value '1' -PropertyType 'DWord' -Force | Out-Null

# enable TLS 1.2 for system
New-Item 'HKLM:\SYSTEM\CurrentControlSet\Control\SecurityProviders\SCHANNEL\Protocols\TLS 1.2\Server' -Force | Out-Null
New-ItemProperty -path 'HKLM:\SYSTEM\CurrentControlSet\Control\SecurityProviders\SCHANNEL\Protocols\TLS 1.2\Server' -name 'Enabled' -value '1' -PropertyType 'DWord' -Force | Out-Null
New-ItemProperty -path 'HKLM:\SYSTEM\CurrentControlSet\Control\SecurityProviders\SCHANNEL\Protocols\TLS 1.2\Server' -name 'DisabledByDefault' -value 0 -PropertyType 'DWord' -Force | Out-Null
New-Item 'HKLM:\SYSTEM\CurrentControlSet\Control\SecurityProviders\SCHANNEL\Protocols\TLS 1.2\Client' -Force | Out-Null
New-ItemProperty -path 'HKLM:\SYSTEM\CurrentControlSet\Control\SecurityProviders\SCHANNEL\Protocols\TLS 1.2\Client' -name 'Enabled' -value '1' -PropertyType 'DWord' -Force | Out-Null
New-ItemProperty -path 'HKLM:\SYSTEM\CurrentControlSet\Control\SecurityProviders\SCHANNEL\Protocols\TLS 1.2\Client' -name 'DisabledByDefault' -value 0 -PropertyType 'DWord' -Force | Out-Null

Write-Host -ForegroundColor Green 'TLS 1.0 and 1.1 disabled. TLS 1.2 enabled.'
3. Disable insecure ciphers…
In a new ISE tab, paste the following code to disable weak ciphers (some commands may fail but that’s okay):
Disable-TlsCipherSuite -Name "TLS_ECDHE_RSA_WITH_AES_256_CBC_SHA384" | Out-Null
Disable-TlsCipherSuite -Name "TLS_ECDHE_RSA_WITH_AES_128_CBC_SHA256" | Out-Null
Disable-TlsCipherSuite -Name "TLS_ECDHE_RSA_WITH_AES_256_CBC_SHA" | Out-Null
Disable-TlsCipherSuite -Name "TLS_ECDHE_RSA_WITH_AES_128_CBC_SHA" | Out-Null
Disable-TlsCipherSuite -Name "TLS_DHE_RSA_WITH_AES_256_CBC_SHA" | Out-Null
Disable-TlsCipherSuite -Name "TLS_DHE_RSA_WITH_AES_128_CBC_SHA" | Out-Null
Disable-TlsCipherSuite -Name "TLS_RSA_WITH_AES_256_GCM_SHA384" | Out-Null
Disable-TlsCipherSuite -Name "TLS_RSA_WITH_AES_128_GCM_SHA256" | Out-Null
Disable-TlsCipherSuite -Name "TLS_RSA_WITH_AES_256_CBC_SHA256" | Out-Null
Disable-TlsCipherSuite -Name "TLS_RSA_WITH_AES_128_CBC_SHA256" | Out-Null
Disable-TlsCipherSuite -Name "TLS_RSA_WITH_AES_256_CBC_SHA" | Out-Null
Disable-TlsCipherSuite -Name "TLS_RSA_WITH_AES_128_CBC_SHA" | Out-Null
Disable-TlsCipherSuite -Name "TLS_RSA_WITH_3DES_EDE_CBC_SHA" | Out-Null
Disable-TlsCipherSuite -Name "TLS_DHE_DSS_WITH_AES_256_CBC_SHA256" | Out-Null
Disable-TlsCipherSuite -Name "TLS_DHE_DSS_WITH_AES_128_CBC_SHA256" | Out-Null
Disable-TlsCipherSuite -Name "TLS_DHE_DSS_WITH_AES_256_CBC_SHA" | Out-Null
Disable-TlsCipherSuite -Name "TLS_DHE_DSS_WITH_AES_128_CBC_SHA" | Out-Null
Disable-TlsCipherSuite -Name "TLS_DHE_DSS_WITH_3DES_EDE_CBC_SHA" | Out-Null
Disable-TlsCipherSuite -Name "TLS_RSA_WITH_RC4_128_SHA" | Out-Null
Disable-TlsCipherSuite -Name "TLS_RSA_WITH_RC4_128_MD5" | Out-Null
Disable-TlsCipherSuite -Name "TLS_RSA_WITH_NULL_SHA256" | Out-Null
Disable-TlsCipherSuite -Name "TLS_RSA_WITH_NULL_SHA" | Out-Null
Disable-TlsCipherSuite -Name "TLS_PSK_WITH_AES_256_GCM_SHA384" | Out-Null
Disable-TlsCipherSuite -Name "TLS_PSK_WITH_AES_128_GCM_SHA256" | Out-Null
Disable-TlsCipherSuite -Name "TLS_PSK_WITH_AES_256_CBC_SHA384" | Out-Null
Disable-TlsCipherSuite -Name "TLS_PSK_WITH_AES_128_CBC_SHA256" | Out-Null
Disable-TlsCipherSuite -Name "TLS_PSK_WITH_NULL_SHA384" | Out-Null
Disable-TlsCipherSuite -Name "TLS_PSK_WITH_NULL_SHA256" | Out-Null

Write-Host -ForegroundColor Green "Weak ciphers disabled."
4. Enable HTTP Strict Transport Security… (Windows 2019+)
a) In IIS Manager, open the HTTP Response Headers section.
b) Click Add.
c) In the Name field, add “Strict-Transport-Security“.
d) In the Value field, add “max-age=31536000” (this corresponds to a one year period validity).
d) Click OK.
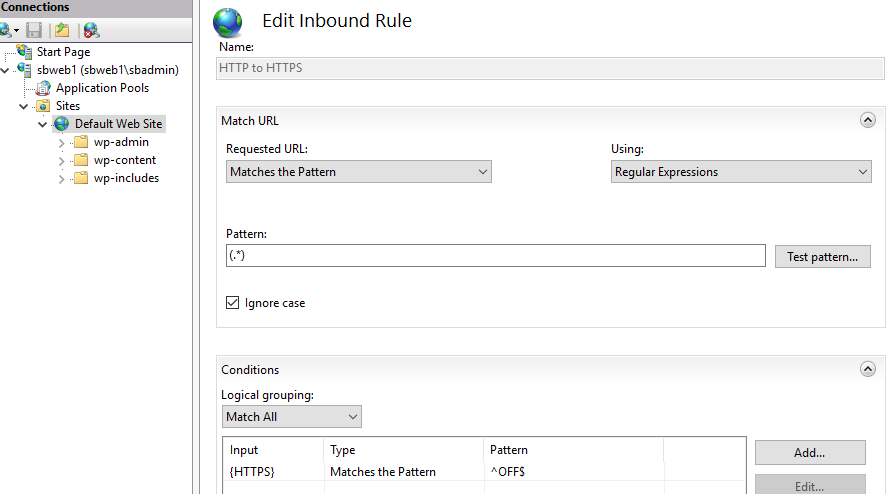
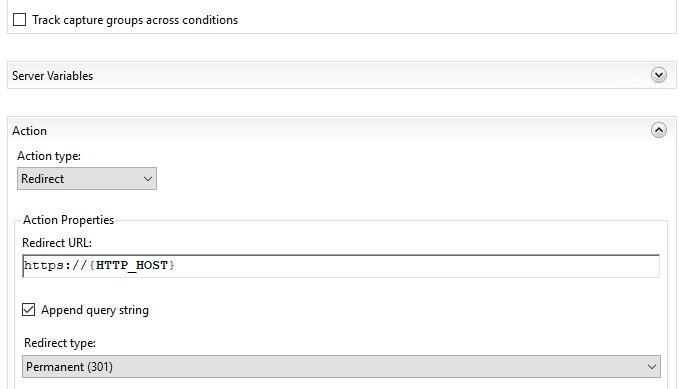
Oh and don’t forget to redirect port 80 to 443… even though the above step effectively forces the browser to use HTTPS, there is no harm doing it with the URL Rewrite feature (I use this so that I can also block connections to my WordPress admin page).
Here is the rule I use at the web site level to redirect any HTTP request to HTTPS:
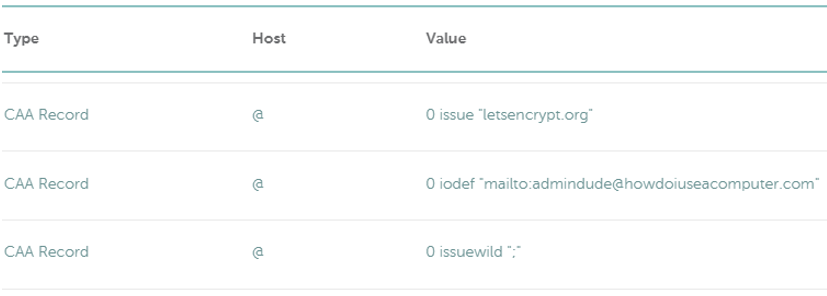
EDIT 02/07/22: totes forgot about step 5 – CAA (Certificate Authority Authorization) records which I enabled on this site. I use namecheap.com who offer these records free with domain name registration. Most DNS providers should support CAA records, if not, well… switch providers I say! 😎 Here is a screenshot of my records:
Superbulous! Now run the test, grab a cup of tea and a biscuit and pat yourself on the back for being so awesome!! 😎 😎 😎
Over and out until next time! Cheers 🍻
![]()